Monday, April 13, 2009

Green Cookie Stamp Pleated Skirt

There really is nothing quite like changing directions in the final stretch, which is what I have done with my swap. The due date is this coming weekend which means I have four days to finish up. But since I do everything at the last minute, it didn't seem so odd to throw in one more project. Because really, as much as I love it, my print linen skirt simply doesn't go with the rest of my plan. Sure, black and white go with everything, but sometimes it's a stretch. Besides, I found some really cool fabric for $3/yard and couldn't pass it up.

This is a cotton stretch vertical stripe herringbone, a texture that has always reminded me of the underside of store-bought cookies. I have seen this weave a lot in coatings, but was pleased to see it in a light bottomweight. The green is a nice bright grass color, which of course reminds me of spring (should it ever truly arrive). To tie it in with my jacket, and just because I'm stubborn, I used the yellow cotton thread purchased for the Dress that Wasn't for construction and topstitching.

I used a pattern which I had purchased several years ago and finally made up for last Thanksgiving, but decided this time to make the shorter length. I really liked the idea of making this a pleated skirt since the body of the fabric was begging to be structured. Looking at the line drawing for the pattern, what really drew me to it in the first place was the interesting belt detail so I decided to do that instead of the tabs and purchased belt shown with the pleated version. (I will get a scan of the pattern when I am able so you can see what I mean)

Since I was spending the day running around Portland on Tuesday, we stopped in to Josephine's Dry Goods (go there if you can!) as I was looking for a small buckle for my belt. I didn't find one I wanted, although I did find a YKK invisible zipper (again with the invisibles) and a few patterns. While we were walking back to the car, I was trying to put together in my head how a skirt with a side zipper could have a double-wrap belt that closed at the front. This would mean taking the belt completely off every time it was worn, and of course the cool crossed detail in the back would shift around while wearing. So I got to thinking, like ya do, about ways to make this work.

The first thing about the pattern's intent is that it wants the belt to be made of a purchased ribbon. Ribbon is (generally) on the straight of grain, and won't make the nifty curves pictured on the envelope. Sneaky, huh? Second, this is a distinctive shade and I knew better than to think I could match it with ribbon. Heck, I was using a yellow zipper in a green skirt (better to miss by a mile than try to match and fail). Using self-fabric bias would solve both of these issues, but that left the question of anchoring the belt in a way that wouldn't interfere with the zipper.

My end solution was to make this not a belt at all, but instead to apply the bias as a faux belt. My intention all along was to topstitch the edges, defining the lines and mimicking the stitching on the jacket, so I chose to simply topstitch the 'belt' to the yoke of the skirt. This added an hour or so to the construction time, but it gave to desired look without the headaches of the original design. To further mimic the look of a belt, I included an overlap with a button and used the belt loop details which also provided a vertical line to break up the horizontals at the hip. At the side closure, just extended the trim to overlap and secure them with two small snaps.

While the pattern called for a narrow facing along the waist edge, I chose to line the yoke as well as bring it up to natural waist. To be sure the trim was even along the top, I applied the yoke lining before the trim, waiting to slipstitch it into place until all of the detail was stitched down. To keep the look of the belt crossing itself and going under the beltloops, I broke the stitching on the underlaps. After the belt was stitched down, I topstitched the belt carriers down.

I was able to wear this for Easter with the striped tangerine top, and got many compliments. With this done, along with all three knit tops, the only things remaining are the tan trousers and the green and chambray blouses. I just may get this done!PICT0011

Retro Rethink Print Dress


I finally made my jumper last week, after much gnashing of teeth about the fabric change. There wasn't really much hope of finding more of a fabric that had been tucked in on the clearance wall three weeks earlier, so it was no great surprise that I had to rethink the dress. I will most likely use the yellow fabric for a top of some kind in the future, since it really is a nice color and texture. But we move on, and with any luck we improve as we go.

The fabric I settled on is a chocolate brown with a vibrant retro floral print. The print has all of the colors in my tops, so will match nicely. It even has the green in the jacket, so it fits right in. As a matter of fact, this is the only piece of my wardrobe that has all of the elements present, making it essentially the 'inspiration' piece even though it was the last to be selected.

This went together very easily, although I did make a few changes in the order of steps from the pattern directions. Honestly, I only looked at them after I was finished for reference. With this being a four-piece pattern it just made sense to assemble the garment in the order that works best for me instead of wrangling instruction sheets. Besides, I typically disregard the zipper instructions for every pattern except trousers.

I have this thing about zippers; I really like them but I hate for them to show. On a pair of trousers, the fly front is part of the design of the garment so it doesn't bother me. But on skirts and dresses, I want them to fade into the lines; which is the basis of my love for the invisible zipper. However, if I insist on using invisibles that means changing most patterns to accomodate this closure because the zipper has to go in before the seam and not the other way around. Sewing the bottom of the seam before the invisible zipper goes in will always result in a pucker at the bottom of the zipper, which makes it rather visible.

I made the darts on front and back, then attached the bodice pieces making a front piece and two back halves. I then installed the zipper down center back and stitched the remainder of the seam. I used a robin's egg blue zipper that was in my stash since it was the color that was closest match- lucky for me it was a YKK and very soft which goes with the weight of the fabric.

The bodice lining was cut from a piece found at goodwill by a friend of mine; it's a pale green with polka dots that had obviously been washed with something red and has random splotches; no problem to cut around for such small pieces. I attached bodice and lining front to back at the shoulder seams then attached the lining at the neck edge. Because there is a contrast between the lining and fashion fabric, after pressing the seam toward the lining I understitched the neck edge. This will keep the lining from creeping out and showing.
Once the lining was attached at the neck edge, I stitched the side seams and bound the armscyes with self bias. The pattern called for this to be done in a standard seam, but since the back seam was already sewn there would not have been a way to turn the garment right sides out. When slip stitching the bodice lining to the waist, I took an inverted box pleat at the gathers to give support the gathers on the bodice.

With the dress assembled, I tried it on for fit then marked the hem. I like to run a machine basting stitch along where the hem will fall which gives me a sharp edge to turn up and press the hem. This is taken out after the hem is stitched but before it is pressed. Since the print is so busy, I went ahead with a machine topstitched hem; the brown cotton thread blends in perfectly. The dress is pictured with my new crinoline in the front view, and without in the back view.

Monday, April 6, 2009

The Great Debate Jacket


Wow, the time is flying by with this SWAP. At my count, I have six of the eleven pieces done; three tops, two bottoms, and now the jacket.

I used Butterick 5332, which stood out in the catalog because of the fun yoke and topstitching. I chose to make the double breasted jacket, mainly because I found some great buttons and wanted to showcase them. Of course that is what ended up making this the most expensive piece in my swap: the buttons are $2 each and I needed eight of them.

Once I put together the other pieces in my swap, I decided to make some changes to the pattern. The double breasted yoke definately works with the nautical style trousers I am making but the open bottom seemed off. Because each of my bottoms has a waistband detail of some kind, I decided to crop the jacket to the waist. Also, that makes it truer to the fashions of the eras I am reflecting in the rest of the wardrobe. The other slight change I made in cutting out the jacket was lengthening the sleeves by 2", to go with the sleeves on the tops I had already cut out.

I started off making the yoke facing, and stitched 1/2" from the raw edge all around the lower edge so that I could press it up evenly. Since there is no back yoke, the facing edge would be my guide for topstitching and I wanted it as even as possible. Applying the yoke to the front was a bit of a challenge due to the sharp rounded corner. Simply stretching to fit wasn't enough, so I snipped to the staystitching in a few places. This may have also been due to the weave on the fabric; I'm using a mid-weight twill and the bias doesn't give as much as other fabrics I have used for shaped seams. After stitching in place, I was able to steam the fabric into submission.

The collar was topstitched before attaching to the neck edge, then the facing was sewn in. For my construction and topstitching I used CC cotton thread. I then pinned the facing in place from the top and started the decorative topstitching.

A few people have asked about a toptstitching tutorial, and I have two words of advice there. First, find a guidepoint on your presser foot. For me, if I set my needle to the far left and use the left edge of my foot as a guide, I get a nice 1/8" from the edge of the fabric. Second, stitch slowly. Because if you don't watch each stitch, they start to wander and you have to start over. For my second row of stitching, I just line up the edge of the presser foot with the first row. And the bonus bit of advice? Make sure everything lines up and fits before topstitching. Because tearing out three rows of stitching is a pain.

The sleeves also are faced, which surprised me because the pattern made it look like an applied cuff. But the facing simply turns to the inside and is topstitched down, giving the look of a cuff. The button lines up with a self-fabric loop. The slash where the loop is attached also creates a nice little pleat at the cuff. See what I mean about the buttons? I debated a bit about the sleeve application, and considered pleating them into the armscye but after a test I liked how the gathering looked and went with that. I finished the seam with a self-fabric bias binding.


Next up was figuring out the waist treatment. I figured my waist measurement plus twice the overlap, and the jacket body was 3" greater than that. Initially I considered gathering the center back to match the sleeve heads, but the fullness wasn't at center, so it pulled into an odd V shape. Stitched pleats were also an option, but I didn't want an odd pucker below my shoulder blades. So I went with darts which shape so nicely. After playing with the fullness, I placed the darts and decided on a triple dart instead of a single dart on each side. After applying the waistband, I finished it with matching topstitching.

The waist closure was another debate; did I want to have one button to the right of the band? Or continue the line from the yoke? Or maybe group two buttons together? In the end, I went with the symmetry and kept the lines of the yoke buttons (thanks to those of you who voted).

So here it is, the finished jacket

And here it is inside out. Because this is an unlined jacket, I was pleased that the yokes are faced, which covered most of the raw edges. The side seams and shoulder seams were flat felled and the armscyes were bound to give a finished look on the inside.

Friday, April 3, 2009

Always take your Time

When I first started my SWAP, I selected my patterns and fabrics. I was so excited by the idea of actually doing this (and the thought of a new wardrobe), that I couldn't wait to finish it. Of course to finish one must get started. So I set up my cutting table, which is a brown folding conference table, and set to cutting. I cut out a total of nine things that day, which was quite the accomplishement. But once something is cut, it's almost finished you see.

Now, a month later, as I am working my way through the stack of pieces, it is a simple thing to select the next project based on color. When I had finished a customer's black dress shirt, I moved easily into a black knit top. After completing a linen shirt I was on to the white blouses. It's a good system, you see.
So yesterday I was excited by the fact that I had yellow thread on the machine and could get to work on my sundress/jumper. With Easter coming, it will make a perfect dress to wear and should look classic with the white blouse which I haven't yet had the chance to wear.

I assembled the bodice, lining it with scraps from the pale green top. I transferred the markings for the darts using tailor's chalk and set to stitching. But when I stopped to press the front darts, something seemed odd; one side was inside out. Silly me, I had forgotten to flip the fabric when transferring the markings. Easily fixed, I picked the stitches on one side and re-marked the darts. After sewing them up again, I was set to sew the center front seam. Then I noticed that there was something even more odd: I had two right fronts. How did I manage to do that? But never to be deterred, I decided to use the back pieces to remedy the situation. That's when I found that I have two right back pieces.

When I was cutting out my nine garments a month ago, I recall that the narrow width required I open the fabric flat in order to get the fullness of the skirt pieces. So I folded it in half, turned, and cut. Except I didn't flip. I cut this out with both halves of the fabric face up. So here I am, with half of a dress. Because there is a texturally obvious right side to this fabric, there is no fudging the problem. Because I laid out the tissue right side up for both the front and back, I can't tweak them to make one whole skirt. The only solution is to purchase more yardage and cut a left front and left back.

I stopped by one of my local JA stores today, and didn't see any of this fabric. It was on the clearance rack so there may not be any at the other JA in town either. I am hoping that since it's an odd shade of yellow I may be the only one in town who is looking for it. If I can't find it, then I'm off to find another piece in this or a similar shade.

Lesson of the day: even in the joy of inspiration. Take Your Time.

Working with What you've Got

One of things I enjoy most about sewing is the sense of having construction something truly unique. To that end, I love the challenge of working with limited materials. Long ago I realized that if anyone said it couldn't be done, I would do just about anything to prove that it indeed could.

This top is one of those projects. I was at Mill End recently, having my selections cut, when I noticed this fabric behind the counter. I was being helped at my favorite counter, the Fashion/Gourmet, and there are always treasures to be found. Turns out this was an end piece of silk, with just a scant 7/8 yard left. But it was perfect. And offered at 70% off! Can I use it? You betcha. I brought it home, and decided that it would make up nicely as B4985 if I left off the sleeves. This is, after all, a spring wardrobe so who needs sleeves?
Cutting out the top was a bit challenging due to the size of the piece but I was able to get it all in, although the bias was in seven pieces. But since it was going to be turned in, bias is bias, right? There are some flaws in the fabric, where the ink is darker around slubs, but the irregular pattern disguises it nicely.
The pattern went together very easily, and I was able to keep my white thread on both machines for most of the construction. I did change to green thread for the buttonholes and hand sewing. Because this is a nice crisp silk I chose to handstitch the hem and armscye bindings instead of topstitching; it just didn't seem like a visible topstitching sort of top. I used organdy for interfacing along the front and in the collar. The buttons are pearlized green squares, which I sewed on as diamonds.

Foundations

As you obviously know, I have a wardrobe that spans many eras. I still can't decide if this is a hobby, a vocation, or a lifestyle choice but it certainly has taught me many things. The most lasting lesson I have learned is that if I am going to truly learn about an era, it means more than simply putting on a dress. To truly absorb the history of a time, you need a foundation.

What this means as a re-enactor is research. Learning what life was like for women, whether it was 120 or 50 years ago, takes a bit of digging. Ask questions of those who remember it. Read first-hand accounts. Look at the history that occured in the decades before. As a woman in 2008, my life is not about 2008. My view of life has been formed by events thirty years ago, and has evolved as I have lived through major changes. That is my foundation. The foundation of a woman living in 1890, or 1950, or 1790, would be built not only on historical fact but also on available choices. Learning these things gives a proper basis for presenting history in the first person.

Just as the presentation requires a basis, so does the wardrobe itself. We live in a time when foundation garments are few, if any. Some day there will be essays written about an era where the only thing between us and our clothes were spanx and wonderbras. In wearing clothes of other eras, this simply will not do. Wearing a Victorian Pollanaise over modern undergaments will look like a costume at best. Researching the layers of shaping garments can be an eye-opener. Corsets, panniers,crinolines, hoop skirts, bustles, girdles. These served to re-shape the body into the pleasing sillhouette of their time. But the one constant throughout history is that there is always one shape which is labeled ideal, and it is expected that something be done to achieve it. As we dress in these historic foundation garments, we begin to appreciate the ideals gone by and understand what a day could have been for our foremothers.

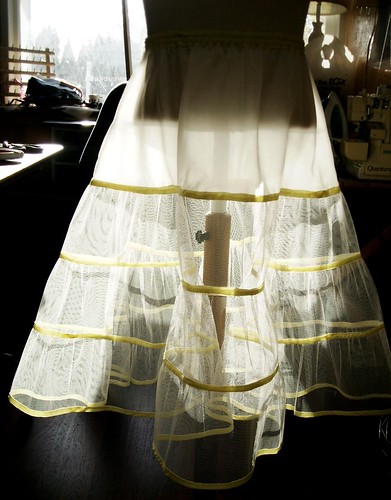
In this spirit, I realized that making a SWAP of vintage-inspired clothing would not be complete without vintage-inspired undergarments. To that end, I have made my first crinoline. I am pleased to report that it was made entirely of materials on hand, most of which I aquired at no cost.
The netting was salvaged from a prom dress I remade last year for a friend; I had no idea how much I had cut off the old skirt at the time, but it measured out to 12 yards.For the yoke, I used a remnant of bemburg found in my lining scraps and the yellow bias was cut from a scrap of china silk.
I took the width measurement of the skirts I would wear this with and subtracted 2" to figure the bottom width of the crinoline. Since the skirt length is 30", I wanted this to be 28" long. This figured out to be three tiers of 6" netting, with a 10" yoke. I measured each tier with a 1:1.5 ratio on the gathers and precut the lengths. After gathering, I sewed each tier together applying bias as I went. I then bound the gathered edge with the bias, pressed it up and topstitched it down. I made this inside out, so that there would be no rough netting edges to snag my hose. After gathering the tiers together, I stitched the back seam and bound it with bias as well. I then assembled the yoke and gathered the final tier to it. The casing is the last of the bias, and the waist is elastic with a drawstring.
I am pleased with the 'cage' look of this crinoline, and will enjoy wearing it. crinoline Since it won't be a frequent item for me to wear, I may leave it on display in my studio. Seems a shame to tuck it away in the closet.