What this means as a re-enactor is research. Learning what life was like for women, whether it was 120 or 50 years ago, takes a bit of digging. Ask questions of those who remember it. Read first-hand accounts. Look at the history that occured in the decades before. As a woman in 2008, my life is not about 2008. My view of life has been formed by events thirty years ago, and has evolved as I have lived through major changes. That is my foundation. The foundation of a woman living in 1890, or 1950, or 1790, would be built not only on historical fact but also on available choices. Learning these things gives a proper basis for presenting history in the first person.
Just as the presentation requires a basis, so does the wardrobe itself. We live in a time when foundation garments are few, if any. Some day there will be essays written about an era where the only thing between us and our clothes were spanx and wonderbras. In wearing clothes of other eras, this simply will not do. Wearing a Victorian Pollanaise over modern undergaments will look like a costume at best. Researching the layers of shaping garments can be an eye-opener. Corsets, panniers,crinolines, hoop skirts, bustles, girdles. These served to re-shape the body into the pleasing sillhouette of their time. But the one constant throughout history is that there is always one shape which is labeled ideal, and it is expected that something be done to achieve it. As we dress in these historic foundation garments, we begin to appreciate the ideals gone by and understand what a day could have been for our foremothers.
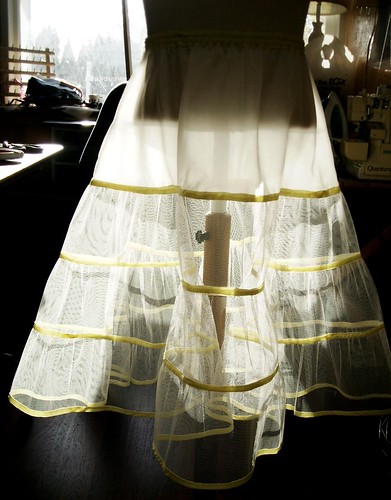
In this spirit, I realized that making a SWAP of vintage-inspired clothing would not be complete without vintage-inspired undergarments. To that end, I have made my first crinoline. I am pleased to report that it was made entirely of materials on hand, most of which I aquired at no cost.
The netting was salvaged from a prom dress I remade last year for a friend; I had no idea how much I had cut off the old skirt at the time, but it measured out to 12 yards.For the yoke, I used a remnant of bemburg found in my lining scraps and the yellow bias was cut from a scrap of china silk.
I took the width measurement of the skirts I would wear this with and subtracted 2" to figure the bottom width of the crinoline. Since the skirt length is 30", I wanted this to be 28" long. This figured out to be three tiers of 6" netting, with a 10" yoke. I measured each tier with a 1:1.5 ratio on the gathers and precut the lengths. After gathering, I sewed each tier together applying bias as I went. I then bound the gathered edge with the bias, pressed it up and topstitched it down. I made this inside out, so that there would be no rough netting edges to snag my hose. After gathering the tiers together, I stitched the back seam and bound it with bias as well. I then assembled the yoke and gathered the final tier to it. The casing is the last of the bias, and the waist is elastic with a drawstring.
I am pleased with the 'cage' look of this crinoline, and will enjoy wearing it.
 Since it won't be a frequent item for me to wear, I may leave it on display in my studio. Seems a shame to tuck it away in the closet.


I LOVE crinolines! This one is exceptionally pretty... And I thoink you are right about it being essential to consider the kinds of foundation garments you wear with the clothing. A beautiful dress or skirt or whatever doens't do anything for you with the wrong undergarments, even today.
ReplyDelete