

I have been sewing for Lavender's Green for over ten years now. In the past decade so very much has changed both in my knowledge of historic sewing techniques and in my life that it is sometimes difficult to recognize myself in my own memories. Ten years ago I had just moved to Portland and still had kids in diapers. I was a disappointed housewife who brought in a little bit of extra cash by sewing and working at a local fabric store. There was no way that I could have known then where I would be now, or how important the friends I had just met would one day become.
There was a week when I was given several dresses to construct in preparation for sale at an event; it was summer of course but I don't recall which month. I do recall sitting in my living room with Mel watching Titanic on DVD and doing hand-sewing work. I also recall that I didn't get many of the dresses complete but rather 'almost done just need a few bits'.
One of the dresses made that week has stayed with me, both in memory and in reality. I am very particular about plaids; they just have to match up or it bothers me. This dress is a large plaid cotton which was being made into a day bodice and skirt. I was having so much trouble wrapping my head around making that plaid line up in a pleated repeat that I asked Mel to pleat it for me. It is very heavy and was a bit of a chore to feed through the machine.
Over the years, this dress has hung on display in the tent at many events. It has been remade and reshaped, shortened and let out. Somewhere along the way a bright red cord was added to the sleeves and center back. It has been tried on, marked down, and lent out but it has not sold. I, too, have been remade and reshaped. My then-new friends have become a family to me and I could not imagine a more loving circle of women. They have seen me through years of debate followed by divorce; they have rejoiced with me in times of triumph. No longer a disappointed housewife, I have learned that I have strength within myself to stand on my own and alongside a loving partner. And that dress is still there.
Last year, it was declared that the dress needed to go away. It had outstayed its welcome and clearly was not going to leave of its own accord. There was talk of it being donated to a lending closet or even left at a charity shop. Instead, it landed in my sewing room with the intent of one more remaking. There it has sat all winter long while I debate whether it is worth the effort. Tonight, I decided that it is time for this dress, these decade-old intentions, to come to a conclusion.
Inspired by talk of remaking day dresses into wrappers, I set about taking the bodice apart one more time. I removed the trim then ripped off the piping at the bottom. I opened up the lining to remove the plastic boning at the front and cut away the XXL tag from the side seam. Next went the pagoda sleeves and the waistband off the skirt. Next up will be remaking the sleeves and choosing a front contrast panel fabric.
Suddenly I am excited to have something new, something made so long ago in such a different world. Because where I am is a result of where I've been and this wrapper will remind me of that each morning as it protects me from the chill and dew.
Wednesday, June 3, 2009
Thursday, May 7, 2009
Finishing Up
It's been a fun few months of "swap"ing, and I am very pleased with the results. I am wearing these garments often, and getting many compliments. My favorite has got to be "really? you made it? like, from scratch?" to me, 'from scratch' involves flour and eggs by why not sewing?
My average week is very eclectic, but I would say a typical week is this:
Weekdays are taken up with studio time, meeting with clients, picking up and dropping off contract sewing, and scouring local shops for materials.
Fridays are often at the winery, moving inventory around and getting ready for the weekend in addition to pouring tastings.
Weekends are usually split between working and a day off. On the days off, we like to have eat out or have a few friends over for supper and games. On the winery days, I spend the day serving wine, listening to jazz, and talking about Oregon.
 Black Knit Top paired with Corduroy Trousers. Perfect for days in the studio, these are comfortable and throw on easily. One down side? I forgot about the corduroy swoosh when I walk.
 Blue Sheer Blouse paired with Corduroy Trousers. A little dressier than the knit tops, this blouse has seen a lot of wear. I love the collar which reminds me of the convertible collars in the teens, it feels like a classic. And the costar in the corner is Spike, trying to get down to the studio
 Orange Hemp Top paired with Tan Poplin Trousers. I love these trousers, which are both comfortable and slimming. The crispness makes them feel dressy and they go with everything. The buttons are from my grandmother's stash which makes them even more fun to wear.
 Green Cotton Blouse paired with Tan Poplin Trousers. This is the outfit that inspired the 'from scratch' comment. I was a little unsure at first about the fullness of the sleeves, but the flared leg on the trousers balances it out. So does the cat behind my feet.
 Striped Knit Top paired with Green Twill Skirt. This was the outfit I wore on Easter, and it went nicely from services to dinner to sitting around watching a movie.
 Print Silk Top paired with Green Twill Skirt. When the weather warms, I am certain this will be a favorite pairing. I love the geometrics of the top, and the two greens compliment each other nicely. I do have to find a pair of closed-toe shoes to wear with it for work.
 Print Silk Top Paired with Print Jumper. One of my favorite combinations, this outfit just makes me feel classy. The print was a complete upset to the plan but I am thrilled with it.
 Blue Sheer Blouse paired with Print Jumper. The last two fabrics I selected just had to be photographed together. I wear this to work with much more sensible shoes.
 Print Silk Blouse, Denim Jacket, and Corduroy Trousers. I love it when fabrics match. It just makes me all happy inside.
 Striped Knit Top, Denim Jacket, and Corduroy Trousers. The only downside to my jacket is that it hides most of my tops. I left it open to show my top, and like the wide lapel effect it creates.
 Silk Print Top, Print Jumper, and Denim Jacket. I know it's underexposed, but I just really liked this photo.
Monday, April 13, 2009
Green Cookie Stamp Pleated Skirt
There really is nothing quite like changing directions in the final stretch, which is what I have done with my swap. The due date is this coming weekend which means I have four days to finish up. But since I do everything at the last minute, it didn't seem so odd to throw in one more project. Because really, as much as I love it, my print linen skirt simply doesn't go with the rest of my plan. Sure, black and white go with everything, but sometimes it's a stretch. Besides, I found some really cool fabric for $3/yard and couldn't pass it up.
This is a cotton stretch vertical stripe herringbone, a texture that has always reminded me of the underside of store-bought cookies. I have seen this weave a lot in coatings, but was pleased to see it in a light bottomweight. The green is a nice bright grass color, which of course reminds me of spring (should it ever truly arrive). To tie it in with my jacket, and just because I'm stubborn, I used the yellow cotton thread purchased for the Dress that Wasn't for construction and topstitching.
I used a pattern which I had purchased several years ago and finally made up for last Thanksgiving, but decided this time to make the shorter length. I really liked the idea of making this a pleated skirt since the body of the fabric was begging to be structured. Looking at the line drawing for the pattern, what really drew me to it in the first place was the interesting belt detail so I decided to do that instead of the tabs and purchased belt shown with the pleated version. (I will get a scan of the pattern when I am able so you can see what I mean)
Since I was spending the day running around Portland on Tuesday, we stopped in to Josephine's Dry Goods (go there if you can!) as I was looking for a small buckle for my belt. I didn't find one I wanted, although I did find a YKK invisible zipper (again with the invisibles) and a few patterns. While we were walking back to the car, I was trying to put together in my head how a skirt with a side zipper could have a double-wrap belt that closed at the front. This would mean taking the belt completely off every time it was worn, and of course the cool crossed detail in the back would shift around while wearing. So I got to thinking, like ya do, about ways to make this work.
The first thing about the pattern's intent is that it wants the belt to be made of a purchased ribbon. Ribbon is (generally) on the straight of grain, and won't make the nifty curves pictured on the envelope. Sneaky, huh? Second, this is a distinctive shade and I knew better than to think I could match it with ribbon. Heck, I was using a yellow zipper in a green skirt (better to miss by a mile than try to match and fail). Using self-fabric bias would solve both of these issues, but that left the question of anchoring the belt in a way that wouldn't interfere with the zipper.
My end solution was to make this not a belt at all, but instead to apply the bias as a faux belt. My intention all along was to topstitch the edges, defining the lines and mimicking the stitching on the jacket, so I chose to simply topstitch the 'belt' to the yoke of the skirt. This added an hour or so to the construction time, but it gave to desired look without the headaches of the original design. To further mimic the look of a belt, I included an overlap with a button and used the belt loop details which also provided a vertical line to break up the horizontals at the hip. At the side closure, just extended the trim to overlap and secure them with two small snaps.
While the pattern called for a narrow facing along the waist edge, I chose to line the yoke as well as bring it up to natural waist. To be sure the trim was even along the top, I applied the yoke lining before the trim, waiting to slipstitch it into place until all of the detail was stitched down. To keep the look of the belt crossing itself and going under the beltloops, I broke the stitching on the underlaps. After the belt was stitched down, I topstitched the belt carriers down.
I was able to wear this for Easter with the striped tangerine top, and got many compliments. With this done, along with all three knit tops, the only things remaining are the tan trousers and the green and chambray blouses. I just may get this done!
This is a cotton stretch vertical stripe herringbone, a texture that has always reminded me of the underside of store-bought cookies. I have seen this weave a lot in coatings, but was pleased to see it in a light bottomweight. The green is a nice bright grass color, which of course reminds me of spring (should it ever truly arrive). To tie it in with my jacket, and just because I'm stubborn, I used the yellow cotton thread purchased for the Dress that Wasn't for construction and topstitching.
I used a pattern which I had purchased several years ago and finally made up for last Thanksgiving, but decided this time to make the shorter length. I really liked the idea of making this a pleated skirt since the body of the fabric was begging to be structured. Looking at the line drawing for the pattern, what really drew me to it in the first place was the interesting belt detail so I decided to do that instead of the tabs and purchased belt shown with the pleated version. (I will get a scan of the pattern when I am able so you can see what I mean)
Since I was spending the day running around Portland on Tuesday, we stopped in to Josephine's Dry Goods (go there if you can!) as I was looking for a small buckle for my belt. I didn't find one I wanted, although I did find a YKK invisible zipper (again with the invisibles) and a few patterns.
 While we were walking back to the car, I was trying to put together in my head how a skirt with a side zipper could have a double-wrap belt that closed at the front. This would mean taking the belt completely off every time it was worn, and of course the cool crossed detail in the back would shift around while wearing. So I got to thinking, like ya do, about ways to make this work.
 The first thing about the pattern's intent is that it wants the belt to be made of a purchased ribbon. Ribbon is (generally) on the straight of grain, and won't make the nifty curves pictured on the envelope. Sneaky, huh? Second, this is a distinctive shade and I knew better than to think I could match it with ribbon. Heck, I was using a yellow zipper in a green skirt (better to miss by a mile than try to match and fail). Using self-fabric bias would solve both of these issues, but that left the question of anchoring the belt in a way that wouldn't interfere with the zipper.
My end solution was to make this not a belt at all, but instead to apply the bias as a faux belt. My intention all along was to topstitch the edges, defining the lines and mimicking the stitching on the jacket, so I chose to simply topstitch the 'belt' to the yoke of the skirt.
 This added an hour or so to the construction time, but it gave to desired look without the headaches of the original design. To further mimic the look of a belt, I included an overlap with a button and used the belt loop details which also provided a vertical line to break up the horizontals at the hip. At the side closure, just extended the trim to overlap and secure them with two small snaps.
While the pattern called for a narrow facing along the waist edge, I chose to line the yoke as well as bring it up to natural waist. To be sure the trim was even along the top, I applied the yoke lining before the trim, waiting to slipstitch it into place until all of the detail was stitched down. To keep the look of the belt crossing itself and going under the beltloops, I broke the stitching on the underlaps. After the belt was stitched down, I topstitched the belt carriers down.
I was able to wear this for Easter with the striped tangerine top, and got many compliments. With this done, along with all three knit tops, the only things remaining are the tan trousers and the green and chambray blouses. I just may get this done!
Retro Rethink Print Dress

I finally made my jumper last week, after much gnashing of teeth about the fabric change. There wasn't really much hope of finding more of a fabric that had been tucked in on the clearance wall three weeks earlier, so it was no great surprise that I had to rethink the dress. I will most likely use the yellow fabric for a top of some kind in the future, since it really is a nice color and texture. But we move on, and with any luck we improve as we go.
The fabric I settled on is a chocolate brown with a vibrant retro floral print. The print has all of the colors in my tops, so will match nicely. It even has the green in the jacket, so it fits right in. As a matter of fact, this is the only piece of my wardrobe that has all of the elements present, making it essentially the 'inspiration' piece even though it was the last to be selected.
This went together very easily, although I did make a few changes in the order of steps from the pattern directions. Honestly, I only looked at them after I was finished for reference. With this being a four-piece pattern it just made sense to assemble the garment in the order that works best for me instead of wrangling instruction sheets. Besides, I typically disregard the zipper instructions for every pattern except trousers.
I have this thing about zippers; I really like them but I hate for them to show. On a pair of trousers, the fly front is part of the design of the garment so it doesn't bother me. But on skirts and dresses, I want them to fade into the lines; which is the basis of my love for the invisible zipper. However, if I insist on using invisibles that means changing most patterns to accomodate this closure because the zipper has to go in before the seam and not the other way around. Sewing the bottom of the seam before the invisible zipper goes in will always result in a pucker at the bottom of the zipper, which makes it rather visible.
I made the darts on front and back, then attached the bodice pieces making a front piece and two back halves. I then installed the zipper down center back and stitched the remainder of the seam. I used a robin's egg blue zipper that was in my stash since it was the color that was closest match- lucky for me it was a YKK and very soft which goes with the weight of the fabric.
The bodice lining was cut from a piece found at goodwill by a friend of mine; it's a pale green with polka dots that had obviously been washed with something red and has random splotches; no problem to cut around for such small pieces. I attached bodice and lining front to back at the shoulder seams then attached the lining at the neck edge. Because there is a contrast between the lining and fashion fabric, after pressing the seam toward the lining I understitched the neck edge. This will keep the lining from creeping out and showing.

Once the lining was attached at the neck edge, I stitched the side seams and bound the armscyes with self bias. The pattern called for this to be done in a standard seam, but since the back seam was already sewn there would not have been a way to turn the garment right sides out. When slip stitching the bodice lining to the waist, I took an inverted box pleat at the gathers to give support the gathers on the bodice.
With the dress assembled, I tried it on for fit then marked the hem. I like to run a machine basting stitch along where the hem will fall which gives me a sharp edge to turn up and press the hem. This is taken out after the hem is stitched but before it is pressed. Since the print is so busy, I went ahead with a machine topstitched hem; the brown cotton thread blends in perfectly. The dress is pictured with my new crinoline in the front view, and without in the back view.

Monday, April 6, 2009
The Great Debate Jacket

Wow, the time is flying by with this SWAP. At my count, I have six of the eleven pieces done; three tops, two bottoms, and now the jacket.
I used Butterick 5332, which stood out in the catalog because of the fun yoke and topstitching. I chose to make the double breasted jacket, mainly because I found some great buttons and wanted to showcase them. Of course that is what ended up making this the most expensive piece in my swap: the buttons are $2 each and I needed eight of them.
Once I put together the other pieces in my swap, I decided to make some changes to the pattern. The double breasted yoke definately works with the nautical style trousers I am making but the open bottom seemed off. Because each of my bottoms has a waistband detail of some kind, I decided to crop the jacket to the waist. Also, that makes it truer to the fashions of the eras I am reflecting in the rest of the wardrobe. The other slight change I made in cutting out the jacket was lengthening the sleeves by 2", to go with the sleeves on the tops I had already cut out.
I started off making the yoke facing, and stitched 1/2" from the raw edge all around the lower edge so that I could press it up evenly. Since there is no back yoke, the facing edge would be my guide for topstitching and I wanted it as even as possible. Applying the yoke to the front was a bit of a challenge due to the sharp rounded corner. Simply stretching to fit wasn't enough, so I snipped to the staystitching in a few places. This may have also been due to the weave on the fabric; I'm using a mid-weight twill and the bias doesn't give as much as other fabrics I have used for shaped seams. After stitching in place, I was able to steam the fabric into submission.
The collar was topstitched before attaching to the neck edge, then the facing was sewn in. For my construction and topstitching I used CC cotton thread. I then pinned the facing in place from the top and started the decorative topstitching.
A few people have asked about a toptstitching tutorial, and I have two words of advice there. First, find a guidepoint on your presser foot. For me, if I set my needle to the far left and use the left edge of my foot as a guide, I get a nice 1/8" from the edge of the fabric. Second, stitch slowly. Because if you don't watch each stitch, they start to wander and you have to start over. For my second row of stitching, I just line up the edge of the presser foot with the first row. And the bonus bit of advice? Make sure everything lines up and fits before topstitching. Because tearing out three rows of stitching is a pain.
 The sleeves also are faced, which surprised me because the pattern made it look like an applied cuff. But the facing simply turns to the inside and is topstitched down, giving the look of a cuff. The button lines up with a self-fabric loop. The slash where the loop is attached also creates a nice little pleat at the cuff. See what I mean about the buttons? I debated a bit about the sleeve application, and considered pleating them into the armscye but after a test I liked how the gathering looked and went with that. I finished the seam with a self-fabric bias binding.
 Next up was figuring out the waist treatment. I figured my waist measurement plus twice the overlap, and the jacket body was 3" greater than that. Initially I considered gathering the center back to match the sleeve heads, but the fullness wasn't at center, so it pulled into an odd V shape. Stitched pleats were also an option, but I didn't want an odd pucker below my shoulder blades. So I went with darts which shape so nicely. After playing with the fullness, I placed the darts and decided on a triple dart instead of a single dart on each side. After applying the waistband, I finished it with matching topstitching.
The waist closure was another debate; did I want to have one button to the right of the band? Or continue the line from the yoke? Or maybe group two buttons together? In the end, I went with the symmetry and kept the lines of the yoke buttons (thanks to those of you who voted).
So here it is, the finished jacket

 And here it is inside out. Because this is an unlined jacket, I was pleased that the yokes are faced, which covered most of the raw edges. The side seams and shoulder seams were flat felled and the armscyes were bound to give a finished look on the inside.
Friday, April 3, 2009
Always take your Time
When I first started my SWAP, I selected my patterns and fabrics. I was so excited by the idea of actually doing this (and the thought of a new wardrobe), that I couldn't wait to finish it. Of course to finish one must get started. So I set up my cutting table, which is a brown folding conference table, and set to cutting. I cut out a total of nine things that day, which was quite the accomplishement. But once something is cut, it's almost finished you see.
Now, a month later, as I am working my way through the stack of pieces, it is a simple thing to select the next project based on color. When I had finished a customer's black dress shirt, I moved easily into a black knit top. After completing a linen shirt I was on to the white blouses. It's a good system, you see.
So yesterday I was excited by the fact that I had yellow thread on the machine and could get to work on my sundress/jumper. With Easter coming, it will make a perfect dress to wear and should look classic with the white blouse which I haven't yet had the chance to wear.
I assembled the bodice, lining it with scraps from the pale green top. I transferred the markings for the darts using tailor's chalk and set to stitching. But when I stopped to press the front darts, something seemed odd; one side was inside out. Silly me, I had forgotten to flip the fabric when transferring the markings. Easily fixed, I picked the stitches on one side and re-marked the darts. After sewing them up again, I was set to sew the center front seam. Then I noticed that there was something even more odd: I had two right fronts. How did I manage to do that? But never to be deterred, I decided to use the back pieces to remedy the situation. That's when I found that I have two right back pieces.
When I was cutting out my nine garments a month ago, I recall that the narrow width required I open the fabric flat in order to get the fullness of the skirt pieces. So I folded it in half, turned, and cut. Except I didn't flip. I cut this out with both halves of the fabric face up. So here I am, with half of a dress. Because there is a texturally obvious right side to this fabric, there is no fudging the problem. Because I laid out the tissue right side up for both the front and back, I can't tweak them to make one whole skirt. The only solution is to purchase more yardage and cut a left front and left back.
I stopped by one of my local JA stores today, and didn't see any of this fabric. It was on the clearance rack so there may not be any at the other JA in town either. I am hoping that since it's an odd shade of yellow I may be the only one in town who is looking for it. If I can't find it, then I'm off to find another piece in this or a similar shade.
Lesson of the day: even in the joy of inspiration. Take Your Time.
Working with What you've Got
One of things I enjoy most about sewing is the sense of having construction something truly unique. To that end, I love the challenge of working with limited materials. Long ago I realized that if anyone said it couldn't be done, I would do just about anything to prove that it indeed could.
This top is one of those projects. I was at Mill End recently, having my selections cut, when I noticed this fabric behind the counter. I was being helped at my favorite counter, the Fashion/Gourmet, and there are always treasures to be found. Turns out this was an end piece of silk, with just a scant 7/8 yard left. But it was perfect. And offered at 70% off! Can I use it? You betcha. I brought it home, and decided that it would make up nicely as B4985 if I left off the sleeves. This is, after all, a spring wardrobe so who needs sleeves?
Cutting out the top was a bit challenging due to the size of the piece but I was able to get it all in, although the bias was in seven pieces. But since it was going to be turned in, bias is bias, right? There are some flaws in the fabric, where the ink is darker around slubs, but the irregular pattern disguises it nicely.
The pattern went together very easily, and I was able to keep my white thread on both machines for most of the construction. I did change to green thread for the buttonholes and hand sewing. Because this is a nice crisp silk I chose to handstitch the hem and armscye bindings instead of topstitching; it just didn't seem like a visible topstitching sort of top. I used organdy for interfacing along the front and in the collar. The buttons are pearlized green squares, which I sewed on as diamonds.

This top is one of those projects. I was at Mill End recently, having my selections cut, when I noticed this fabric behind the counter. I was being helped at my favorite counter, the Fashion/Gourmet, and there are always treasures to be found. Turns out this was an end piece of silk, with just a scant 7/8 yard left. But it was perfect. And offered at 70% off! Can I use it? You betcha. I brought it home, and decided that it would make up nicely as B4985 if I left off the sleeves. This is, after all, a spring wardrobe so who needs sleeves?

Cutting out the top was a bit challenging due to the size of the piece but I was able to get it all in, although the bias was in seven pieces. But since it was going to be turned in, bias is bias, right? There are some flaws in the fabric, where the ink is darker around slubs, but the irregular pattern disguises it nicely.
The pattern went together very easily, and I was able to keep my white thread on both machines for most of the construction. I did change to green thread for the buttonholes and hand sewing. Because this is a nice crisp silk I chose to handstitch the hem and armscye bindings instead of topstitching; it just didn't seem like a visible topstitching sort of top. I used organdy for interfacing along the front and in the collar. The buttons are pearlized green squares, which I sewed on as diamonds.

Foundations
As you obviously know, I have a wardrobe that spans many eras. I still can't decide if this is a hobby, a vocation, or a lifestyle choice but it certainly has taught me many things. The most lasting lesson I have learned is that if I am going to truly learn about an era, it means more than simply putting on a dress. To truly absorb the history of a time, you need a foundation.
What this means as a re-enactor is research. Learning what life was like for women, whether it was 120 or 50 years ago, takes a bit of digging. Ask questions of those who remember it. Read first-hand accounts. Look at the history that occured in the decades before. As a woman in 2008, my life is not about 2008. My view of life has been formed by events thirty years ago, and has evolved as I have lived through major changes. That is my foundation. The foundation of a woman living in 1890, or 1950, or 1790, would be built not only on historical fact but also on available choices. Learning these things gives a proper basis for presenting history in the first person.
Just as the presentation requires a basis, so does the wardrobe itself. We live in a time when foundation garments are few, if any. Some day there will be essays written about an era where the only thing between us and our clothes were spanx and wonderbras. In wearing clothes of other eras, this simply will not do. Wearing a Victorian Pollanaise over modern undergaments will look like a costume at best. Researching the layers of shaping garments can be an eye-opener. Corsets, panniers,crinolines, hoop skirts, bustles, girdles. These served to re-shape the body into the pleasing sillhouette of their time. But the one constant throughout history is that there is always one shape which is labeled ideal, and it is expected that something be done to achieve it. As we dress in these historic foundation garments, we begin to appreciate the ideals gone by and understand what a day could have been for our foremothers.
In this spirit, I realized that making a SWAP of vintage-inspired clothing would not be complete without vintage-inspired undergarments. To that end, I have made my first crinoline. I am pleased to report that it was made entirely of materials on hand, most of which I aquired at no cost.
The netting was salvaged from a prom dress I remade last year for a friend; I had no idea how much I had cut off the old skirt at the time, but it measured out to 12 yards.For the yoke, I used a remnant of bemburg found in my lining scraps and the yellow bias was cut from a scrap of china silk.
I took the width measurement of the skirts I would wear this with and subtracted 2" to figure the bottom width of the crinoline. Since the skirt length is 30", I wanted this to be 28" long. This figured out to be three tiers of 6" netting, with a 10" yoke. I measured each tier with a 1:1.5 ratio on the gathers and precut the lengths. After gathering, I sewed each tier together applying bias as I went. I then bound the gathered edge with the bias, pressed it up and topstitched it down. I made this inside out, so that there would be no rough netting edges to snag my hose. After gathering the tiers together, I stitched the back seam and bound it with bias as well. I then assembled the yoke and gathered the final tier to it. The casing is the last of the bias, and the waist is elastic with a drawstring.
I am pleased with the 'cage' look of this crinoline, and will enjoy wearing it.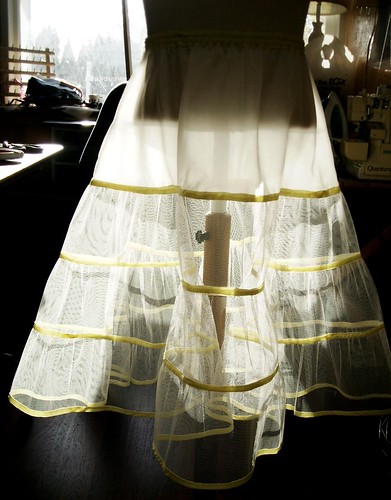 Since it won't be a frequent item for me to wear, I may leave it on display in my studio. Seems a shame to tuck it away in the closet.
What this means as a re-enactor is research. Learning what life was like for women, whether it was 120 or 50 years ago, takes a bit of digging. Ask questions of those who remember it. Read first-hand accounts. Look at the history that occured in the decades before. As a woman in 2008, my life is not about 2008. My view of life has been formed by events thirty years ago, and has evolved as I have lived through major changes. That is my foundation. The foundation of a woman living in 1890, or 1950, or 1790, would be built not only on historical fact but also on available choices. Learning these things gives a proper basis for presenting history in the first person.
Just as the presentation requires a basis, so does the wardrobe itself. We live in a time when foundation garments are few, if any. Some day there will be essays written about an era where the only thing between us and our clothes were spanx and wonderbras. In wearing clothes of other eras, this simply will not do. Wearing a Victorian Pollanaise over modern undergaments will look like a costume at best. Researching the layers of shaping garments can be an eye-opener. Corsets, panniers,crinolines, hoop skirts, bustles, girdles. These served to re-shape the body into the pleasing sillhouette of their time. But the one constant throughout history is that there is always one shape which is labeled ideal, and it is expected that something be done to achieve it. As we dress in these historic foundation garments, we begin to appreciate the ideals gone by and understand what a day could have been for our foremothers.
In this spirit, I realized that making a SWAP of vintage-inspired clothing would not be complete without vintage-inspired undergarments. To that end, I have made my first crinoline. I am pleased to report that it was made entirely of materials on hand, most of which I aquired at no cost.
The netting was salvaged from a prom dress I remade last year for a friend; I had no idea how much I had cut off the old skirt at the time, but it measured out to 12 yards.For the yoke, I used a remnant of bemburg found in my lining scraps and the yellow bias was cut from a scrap of china silk.
I took the width measurement of the skirts I would wear this with and subtracted 2" to figure the bottom width of the crinoline. Since the skirt length is 30", I wanted this to be 28" long. This figured out to be three tiers of 6" netting, with a 10" yoke. I measured each tier with a 1:1.5 ratio on the gathers and precut the lengths. After gathering, I sewed each tier together applying bias as I went. I then bound the gathered edge with the bias, pressed it up and topstitched it down. I made this inside out, so that there would be no rough netting edges to snag my hose. After gathering the tiers together, I stitched the back seam and bound it with bias as well. I then assembled the yoke and gathered the final tier to it. The casing is the last of the bias, and the waist is elastic with a drawstring.
I am pleased with the 'cage' look of this crinoline, and will enjoy wearing it.
Since it won't be a frequent item for me to wear, I may leave it on display in my studio. Seems a shame to tuck it away in the closet.
Monday, March 30, 2009
Marlene's Trousers
I finished the first pair of trousers for my swap, and it was the first time I had used a Burda (7944) trouser pattern. So this was a fun project to tackle. First note: I do not fit Burda trousers.
This was something I had wanting to make for a long time, since my work wardrobe is casual, which has come to mean that I wear a lot of jeans. While this isn't really a bad thing, I do like wearing something a bit nicer and given the cut of jeans today sometimes I have a hard time keeping my tops tucked in. So a pair of cords that are actually at my waist was appealing.
The fabric is a navy corduroy with a tan base color. (Photographing corduroy is a challenge, so bear with me on some of the photos) I chose a cotton thread to match the base tan color on the fabric, and planned to do a lot of topstitching to give the feel of a pair of vintage-styled jeans. The pattern is actually called Marlene Dietrich by Burda, which fit well into my retro theme.
The first issue I ran into was that the rise was not nearly deep enough for me. After basting the waistband in place, it seemed that it was sitting too high as well. So I addressed the issue from two fronts: I deepened the bottom of the center seam and also shortened the darts at the back. This allowed the trousers to ride lower which was a much better fit. For good measure, I let out the side seam at the hip which gave a bit of wearing ease.
After adjusting for fit, I tried them on again, to find that with the wide waistband the trousers were 2" above my natural waist. I did appreciate the irony that in trying to avoid low rise jeans I had made a pair of high rise cords, but I knew that these would end up at the bottom of my dresser drawer if I didn't adjust the waist. First I cut 1/2" off the top of the trousers themselves. I then re-drew the waistband pieces and eliminated 3/8" on both the top and bottom. This worked well, and now the top of the waistband is a scant 1/2" above natural waist, which is a much more comfortable style for me.
Besides fit issues, I made a few design changes as well. Because I just can't leave anything alone; it's a curse. First of all, I have no idea why anyone would put pleats in a pair of trousers. Why oh why would anyone want to add fullness there? This was an easy fix, just take a tuck in the pattern tissue before cutting.
When cutting these out, I was undecided about whether to leave the cuff in the leg so I cut the full length. After I finished them, I decided to make at deep hem (5") but no cuff. I did leave the fabric though so I can adjust that later if I wish.
My third adjustment was just a change in method; instead of making a stitched buttonhole for the tab to pass through I used a bound buttonhole. Given the nature of the material, I was concerned that a stitched buttonhole would eventually unravel at the ends. Also, given that I was using contrast thread, I didn't want to add a focal point which could take away from the main detail of the trousers, the tabs.
I am very pleased with the outcome, and have already worn these to work twice so they definately fit into my 'real life' wardrobe. There were some pleasant surprises along the way, such as having the tab closure work on its own without any hidden buttons or snaps. I was worried that the off-center buttons would make the center front bow out but it lays perfectly. But after all the tweaking I probably won't make a second pair. Also, they are unique enough that they aren't the type of garment I would want three of.
Next up: the jacket. I really want to wear this one soon.
This was something I had wanting to make for a long time, since my work wardrobe is casual, which has come to mean that I wear a lot of jeans. While this isn't really a bad thing, I do like wearing something a bit nicer and given the cut of jeans today sometimes I have a hard time keeping my tops tucked in. So a pair of cords that are actually at my waist was appealing.

The fabric is a navy corduroy with a tan base color. (Photographing corduroy is a challenge, so bear with me on some of the photos) I chose a cotton thread to match the base tan color on the fabric, and planned to do a lot of topstitching to give the feel of a pair of vintage-styled jeans. The pattern is actually called Marlene Dietrich by Burda, which fit well into my retro theme.
The first issue I ran into was that the rise was not nearly deep enough for me. After basting the waistband in place, it seemed that it was sitting too high as well. So I addressed the issue from two fronts: I deepened the bottom of the center seam and also shortened the darts at the back. This allowed the trousers to ride lower which was a much better fit. For good measure, I let out the side seam at the hip which gave a bit of wearing ease.
After adjusting for fit, I tried them on again, to find that with the wide waistband the trousers were 2" above my natural waist. I did appreciate the irony that in trying to avoid low rise jeans I had made a pair of high rise cords, but I knew that these would end up at the bottom of my dresser drawer if I didn't adjust the waist. First I cut 1/2" off the top of the trousers themselves. I then re-drew the waistband pieces and eliminated 3/8" on both the top and bottom. This worked well, and now the top of the waistband is a scant 1/2" above natural waist, which is a much more comfortable style for me.

Besides fit issues, I made a few design changes as well. Because I just can't leave anything alone; it's a curse. First of all, I have no idea why anyone would put pleats in a pair of trousers. Why oh why would anyone want to add fullness there? This was an easy fix, just take a tuck in the pattern tissue before cutting.
When cutting these out, I was undecided about whether to leave the cuff in the leg so I cut the full length. After I finished them, I decided to make at deep hem (5") but no cuff. I did leave the fabric though so I can adjust that later if I wish.

My third adjustment was just a change in method; instead of making a stitched buttonhole for the tab to pass through I used a bound buttonhole. Given the nature of the material, I was concerned that a stitched buttonhole would eventually unravel at the ends. Also, given that I was using contrast thread, I didn't want to add a focal point which could take away from the main detail of the trousers, the tabs.
I am very pleased with the outcome, and have already worn these to work twice so they definately fit into my 'real life' wardrobe. There were some pleasant surprises along the way, such as having the tab closure work on its own without any hidden buttons or snaps. I was worried that the off-center buttons would make the center front bow out but it lays perfectly. But after all the tweaking I probably won't make a second pair. Also, they are unique enough that they aren't the type of garment I would want three of.

Next up: the jacket. I really want to wear this one soon.
Sneaking in Sewing
It's been a busy few weeks, with more selling of wine than sewing of garments, but I was able get a few things done in the studio. After completing a black men's shirt for a customer, I made up the first of my knit tops. This was made entirely on the serger, with the exception of the hems. I love this pattern, which I purchased two years ago with some retro 70's knit. The knit sat in a pile with the pattern and some brown twill for years until I decided that I needed a new outfit for Thanksgiving last year and made up the top and skirt in a day. Makes all of that sitting in the drawer seem silly.
But I was happy to discover that the pattern fits perfectly goes together in less than an hour so I'm using it for three knit tops in my swap. For this one, I cut a wider neck with the intent of making it a boatneck. It isn't quite that wide, but works very well. Boatnecks can be difficult to pair with foundation garments. This top also has longer sleeves than the other two; more of a true short sleeve than the cap sleeve.
The neck edge binding is bias-cut self fabric which works very well. Because I had re-sized the neck, I cut the bias 1" shorter than the overall neck edge and that worked perfectly.
It had been years since I had used my double needle, but it sure came in handy. It makes such a nice finish on a knit and has just enough stretch to it that I won't have to worry about the hems popping. For the neck edge, I did a shallow zigzag with a long stitch. In all, I am pleased the the second top from this pattern was as successful as the first and will be making many more. No more store-bought tshirts for me.
But I was happy to discover that the pattern fits perfectly goes together in less than an hour so I'm using it for three knit tops in my swap. For this one, I cut a wider neck with the intent of making it a boatneck. It isn't quite that wide, but works very well. Boatnecks can be difficult to pair with foundation garments. This top also has longer sleeves than the other two; more of a true short sleeve than the cap sleeve.
The neck edge binding is bias-cut self fabric which works very well. Because I had re-sized the neck, I cut the bias 1" shorter than the overall neck edge and that worked perfectly.

It had been years since I had used my double needle, but it sure came in handy. It makes such a nice finish on a knit and has just enough stretch to it that I won't have to worry about the hems popping. For the neck edge, I did a shallow zigzag with a long stitch. In all, I am pleased the the second top from this pattern was as successful as the first and will be making many more. No more store-bought tshirts for me.

Friday, March 20, 2009
moving along and making changes
I have been sewing again this week, and it feels like a vacation after working at the winery for five days straight. It's funny how you get into habits and when they change everything gets discombobulated. You do get a lot of thinking done while working on the bottling line though; I kept getting Alice's Restaurant stuck in my head while waiting for the bottles to 'come around again on the guitar' as it were. Paul didn't think that was funny but I sure did. Maybe it was the up at 5am talking.
Yesterday I got two shirts finished and shipped out the door. One was another Rick Deckard shirt, which is becoming my staple garment. However, my long saga of searching for black geometric print fabric continues, and I am sad to say that my favorite fabric so far is now on its way to Kentucky, never to be seen again. I would love to find some kind old lady who has a bolt of fabric just like they used in Blade Runner laying around her attic. Meanwhile, at least it keeps variety in the sewing.
The other shirt to go yesterday was a blue chambray work shirt, which is always an easy project to put together. It doesn't even involve a pattern (we don't need no stinkin' pattern) or much cutting; I just tear rectangles for the shirt body, sleeves, cuffs, and placket. I do cut the underarm gussets and the collar but everything else is torn. Easy to do, but there is the issue of long cotton threads everywhere until construction gets well underway. The simplicity of making these shirts is very comforting, and I'm able to churn one out in less than two hours. I had thought there were some pewter shirt buttons lying around but was mistaken, so the customer lucked out and has mother of pearl buttons on his work shirt. The blue/gray hue looks very nice with the fabric so I'm sure he'll be pleased.
Between finishing the black shirt and starting the blue, I did manage to squeeze in some sewing for me; I got the rayon knit top made. It was done almost completely on the serger so I wanted to get it finished before changing out the cones. The pictures I took came out blurry, so I'll have to retake them. Or maybe I can get someone to get some pictures of me in it tomorrow night.
Monday, March 16, 2009
Using the Stash
I have finished the second item from my swap; actually it's been done for almost a week but I got distracted by work. Very annoying, when working tries to take precedence over sewing; I'm working on how to eliminate that problem. Meanwhile, back to our regularly scheduled programming: 
For this blouse, I used S7167(oop) with a few alterations. First, since I am planning to make a 1/2 sleeve jacket, I shortened the sleeve to match. When worn with the jacket, the turned cuff will turn up over the jacket sleeve.
The other alteration just, well, happened. This is one made from a stash piece of corded swiss dot. Not from my stash, mind you, but from a friend's stash. The best part of having good friends who sew is the communal nature of the stacks. It is a wonderful fabric, but being the end of a bolt (I think there was a full yard but I could be wrong), there were a few interesting bits to contend with.
First off, matching stripes was not an option. I'm not too worried about that since they are white on white so any random meetings at the seams aren't glaring at anyone. The second issue with this piece was tape residue. I didn't even notice until after I had cut out the blouse that one of the front pieces had a yellow streak on the reverse that showed through.
 But never to be deterred by little things, I started looking at options to hide the icky yellow dried glue bit. After reviewing my scraps (I don't throw them out for a reason), I found a piece large enough to cut a front yoke. Because the offending mark was near the neckline, I was able to cut it off and replace it with this design detail. Yup, that's what we call this in 'the biz'. I considered inserting some irish lace in the seam, but that didn't seem to go with the style. Instead, I found a few scraps of entre-deux that matched the fabric perfectly.
So that neat yoke? Did it on purpose. Matching the stripe there was important, so I hand-basted to make sure nothing slipped in the sewing process. I then serged off the seams, and was back in business.
One note about fit; I noticed after I took this picture that there is a bit of stress at the bustline. Don't worry, my mannequin is more blessed than I and the pulling doesn't happen when I'm the one wearing the blouse.
 Because I just love bias-cut stripes, I cut the sleeve facing on the bias. I really like how crisp it all turned out; I used some fusible shirtailor on the facings which worked beautifully. I need to get more.
The buttons were a perfect find too; I'm not sure why but several of my swap pieces have square or diamond buttons. Maybe I'm just drawn to unique shapes, or perhaps it's the clean lines that make me want to spice it up a bit with the buttons.
There's black thread on the serger now, which means the next thing up will be my black knit top. I can't wait; there is just something about rayon knit.

For this blouse, I used S7167(oop) with a few alterations. First, since I am planning to make a 1/2 sleeve jacket, I shortened the sleeve to match. When worn with the jacket, the turned cuff will turn up over the jacket sleeve.
The other alteration just, well, happened. This is one made from a stash piece of corded swiss dot. Not from my stash, mind you, but from a friend's stash. The best part of having good friends who sew is the communal nature of the stacks. It is a wonderful fabric, but being the end of a bolt (I think there was a full yard but I could be wrong), there were a few interesting bits to contend with.
First off, matching stripes was not an option. I'm not too worried about that since they are white on white so any random meetings at the seams aren't glaring at anyone. The second issue with this piece was tape residue. I didn't even notice until after I had cut out the blouse that one of the front pieces had a yellow streak on the reverse that showed through.
 But never to be deterred by little things, I started looking at options to hide the icky yellow dried glue bit. After reviewing my scraps (I don't throw them out for a reason), I found a piece large enough to cut a front yoke. Because the offending mark was near the neckline, I was able to cut it off and replace it with this design detail. Yup, that's what we call this in 'the biz'. I considered inserting some irish lace in the seam, but that didn't seem to go with the style. Instead, I found a few scraps of entre-deux that matched the fabric perfectly.
 So that neat yoke? Did it on purpose. Matching the stripe there was important, so I hand-basted to make sure nothing slipped in the sewing process. I then serged off the seams, and was back in business.
One note about fit; I noticed after I took this picture that there is a bit of stress at the bustline. Don't worry, my mannequin is more blessed than I and the pulling doesn't happen when I'm the one wearing the blouse.
 Because I just love bias-cut stripes, I cut the sleeve facing on the bias. I really like how crisp it all turned out; I used some fusible shirtailor on the facings which worked beautifully. I need to get more.
The buttons were a perfect find too; I'm not sure why but several of my swap pieces have square or diamond buttons. Maybe I'm just drawn to unique shapes, or perhaps it's the clean lines that make me want to spice it up a bit with the buttons.
There's black thread on the serger now, which means the next thing up will be my black knit top. I can't wait; there is just something about rayon knit.
Friday, March 6, 2009
One down..
I started working on this a few days ago, but forced myself to get the 'real work' done before going back to it. I'm grouping my items by color, which is how I like to manage my work sewing as well. This keeps me from having to change out the serger cones five times a day. So since I was working on a linen/rayon shirt and a cream sheer dress this week, it made sense to finish up my linen skirt.
A few notes about fibers; when sewing on linen, I really prefer to use cotton thread. It has a similar sheen to the fabric, and allows me to use the high heat when pressing. This was particularly useful on this skirt, since it's a 'crisp' linen and needed to be steamed and smashed into submission. I like to fool myself into believing it will be less wrinkly than other linens. We all know that it means when I sit down ginormous creases will appear and refuse to go away until the skirt is washed. hmmmph.
Also on the topic of fibers, I chose organdy to interface the waist since it has a great crispness which accents the hand of the fashion fabric. Why is organdy always twisted off grain? One of those mysteries I suppose. So after yanking it the other direction and steaming it back on grain, I cut the facing pieces and then 130" of 4" bias strips for the hem facing. Because this skirt will only occasionally worn with a crinoline, I wanted to give the hem some oomph to keep it from collapsing.
Enough about fibers, on to cutting. As I have said before, this is an adapted 1949 pattern. The original was a formal skirt which showed options for either floor length or mid-calf. I think this is why the pattern has been in my files for so many years; I love the waist detail but when would I wear a floor-length skirt? To shorten the skirt, I took a 4" tuck in the pattern pieces to keep the hem width. Also, since the original is extremely high waisted, I made the 'petite' adjustment at the waist. That's something I've never needed to do before! Because this is an eight-gore skirt, I marked each piece in the seam allowance to keep them from getting mixed up. This was a trick I picked up when learning to make corsets: number each seam. So CF is 1, CF to SF is 2, SF to SB is 3, etc. I did this on the facing pieces as well.
Once I had done the basic long seams, I found that the skirt was too large at the waist by almost 8 inches. I should have measured the pattern when cutting, but relied on the printed actual size measurements instead. Better than to small I suppose, since I had used up the fabric and didn't want to go adding gores or spending more. It was an easy enough fix; with eight seams on the skirt I simply increased the seam allowance on all seams by 1/2". I tapered that out to avoid loosing the fullness at the hem. Once I had tried on the skirt, I serged the seams and finished them with an edgestitching.
The other major alteration I did to this pattern was the closure. The pattern called for a front button closure, but I just couldn't find any buttons that worked well with the fabric. Because of the print, it would have taken some pretty bold buttons to stand out, and I was afraid that would make the skirt difficult to pair with a variety of tops. Since the point of the swap is to make versatile garments, I chose instead to use a CB invisible zipper. It was easy enough to disregard the front facing, and the zipper just sits in a regular seam allowance. I did leave the back seam open until all fitting was finished so that I wouldn't have to futz with the zipper once it was in.
After trying on the skirt, I found that the waist detail was still much too high waisted; the original would have made an empire waist effect. That would actually be stunning in a velveteen with a satin blouse, and I may one day make that. But for my purposes, I took another 1/2" off the top when I applied the facing. After trimming and turning, I pressed the facing and finished with an edgestich as with the long seams.
For the hem, I used a facing instead of a turned hem. With a circle hem, it is never fun to draw up the excess and I prefer to avoid that if possible. By using bias organdy strips, I was able to steam the facing to the shape of the skirt easily. Because edgestitching is a feature on the rest of the skirt as well as my other garments, I topstitched the hem to complete the semi-tailored look.
In all, I am very pleased with this skirt. I can't wait to wear it out and show off.
 Next up will be my white cotton shirt since the white cotton thread is still on the machine.
A few notes about fibers; when sewing on linen, I really prefer to use cotton thread. It has a similar sheen to the fabric, and allows me to use the high heat when pressing. This was particularly useful on this skirt, since it's a 'crisp' linen and needed to be steamed and smashed into submission. I like to fool myself into believing it will be less wrinkly than other linens. We all know that it means when I sit down ginormous creases will appear and refuse to go away until the skirt is washed. hmmmph.
Also on the topic of fibers, I chose organdy to interface the waist since it has a great crispness which accents the hand of the fashion fabric. Why is organdy always twisted off grain? One of those mysteries I suppose. So after yanking it the other direction and steaming it back on grain, I cut the facing pieces and then 130" of 4" bias strips for the hem facing. Because this skirt will only occasionally worn with a crinoline, I wanted to give the hem some oomph to keep it from collapsing.
Enough about fibers, on to cutting. As I have said before, this is an adapted 1949 pattern. The original was a formal skirt which showed options for either floor length or mid-calf. I think this is why the pattern has been in my files for so many years; I love the waist detail but when would I wear a floor-length skirt? To shorten the skirt, I took a 4" tuck in the pattern pieces to keep the hem width. Also, since the original is extremely high waisted, I made the 'petite' adjustment at the waist. That's something I've never needed to do before! Because this is an eight-gore skirt, I marked each piece in the seam allowance to keep them from getting mixed up. This was a trick I picked up when learning to make corsets: number each seam. So CF is 1, CF to SF is 2, SF to SB is 3, etc. I did this on the facing pieces as well.
Once I had done the basic long seams, I found that the skirt was too large at the waist by almost 8 inches. I should have measured the pattern when cutting, but relied on the printed actual size measurements instead. Better than to small I suppose, since I had used up the fabric and didn't want to go adding gores or spending more. It was an easy enough fix; with eight seams on the skirt I simply increased the seam allowance on all seams by 1/2". I tapered that out to avoid loosing the fullness at the hem. Once I had tried on the skirt, I serged the seams and finished them with an edgestitching.
The other major alteration I did to this pattern was the closure. The pattern called for a front button closure, but I just couldn't find any buttons that worked well with the fabric. Because of the print, it would have taken some pretty bold buttons to stand out, and I was afraid that would make the skirt difficult to pair with a variety of tops. Since the point of the swap is to make versatile garments, I chose instead to use a CB invisible zipper. It was easy enough to disregard the front facing, and the zipper just sits in a regular seam allowance. I did leave the back seam open until all fitting was finished so that I wouldn't have to futz with the zipper once it was in.
After trying on the skirt, I found that the waist detail was still much too high waisted; the original would have made an empire waist effect. That would actually be stunning in a velveteen with a satin blouse, and I may one day make that. But for my purposes, I took another 1/2" off the top when I applied the facing. After trimming and turning, I pressed the facing and finished with an edgestich as with the long seams.

For the hem, I used a facing instead of a turned hem. With a circle hem, it is never fun to draw up the excess and I prefer to avoid that if possible. By using bias organdy strips, I was able to steam the facing to the shape of the skirt easily.
 Because edgestitching is a feature on the rest of the skirt as well as my other garments, I topstitched the hem to complete the semi-tailored look.
In all, I am very pleased with this skirt. I can't wait to wear it out and show off.

 Next up will be my white cotton shirt since the white cotton thread is still on the machine.
Tuesday, March 3, 2009
the Plan
see, I knew I would get this done. My intention was to get this done at work today, so I packed up my handy tote bag with pencils, paper, and such. But then I had to work at work today which was an odd but not unpleasant change from the normal Monday in the tasting room.
In any event, here's my final plan.

Linen Print Skirt, based on a 1949 reprint. I lowered the waistline and raised the hem to give it a more 50's look. The yellow jumper is a bright yellow cotton, with just a hint of egg yolk. These will come in handy on weekends while working in the tasting room and for Past Times events.
The trousers both have wide waistbands and pleated leg; one textured tan poplin with off-center button closure, the other is navy/tan corduroy with tab closure. These are practical for weekdays in the studio or winery when there is stocking to be done.
Three fitted shirts. Corded Swiss Dot with 1/2 sleeve and turned cuff has entre-deux detail at yoke. Green Print Silk sleeveless shirt has geometric print and fitted lower bodice with gathered yoke. Pale Green Cotton Poplin shirt will have floral glass buttons and simple tailoring.
Three knit shirts. Black shirt is made of Rayon/Spandex, and will have a boat neck with 1/2 sleeves. Orange Hemp knit and Orange/Yellow Stripe Cotton knit have scoop necklines and cap sleeves. All three are tunic length to stay tucked in while I'm lifting wine cases and working in the studio.
Green Twill Jacket is Double Breasted with topstitched details in yellow thread and matching yellow paisley buttons. While the digital photos aren't showing the color well, the jacket is the color of the print on the silk blouse, and the buttons/thread will match the yellow jumper.
Since the point of the plan is to create a wardrobe which works well no matter how you mix it, here is my mix and match plan. Keep in mind that the green cropped jacket would go with any of these.


Saturday, February 28, 2009
Retro Springtime Inspiration
I realized that I jumped in without explaining the Plan in my sewing. I do that sometimes (a lot) so bear with me there. As I said in my previous post, I love the classic styles that never seem to go out of fashion. Marlene Dietrich, Audrey Hepburn, Grace Kelly. Just wearing classic styles reminds me of them and adds a lilt to my walk, a confidence to my conversations.
As I selected fabrics and styles for this collection, I envisioned springtime in New York or Paris, circa 1935-1955. I am intentionally mixing eras because my everyday is a collection of varied activities, all focused around the central theme of history, creativity, and love of place.
My four bottoms pieces are a gored skirt, a jumper/sundress, and two pair of flared trousers.
My six tops are three knit tops and three fitted shirts.
And for my coat, I will make a twill cropped double breasted jacket.
My palette consists of two basics and two colors.
Black and Warm White with shades Orange and Green.
I hope this makes sense. That storyboard should be coming soon.
Wednesday, February 25, 2009
Retro Springtime (sewing with a plan)
Well, it's that time of year when I start to get sick of the gray skies and most everything in my closet. I've been considering doing a SWAP for a few years now, and decided this is the year to jump in. This may be a mini-swap though; we will see how much I get done.
I have always loved the classic styles of the 30's and 40's, and have been wearing more and more vintage and vintage inspired clothing the past few years. Because I recently started up the Past Times Society (more about that later) I will be needing more vintage clothing from a variety of decades. Because I am rather practical, I don't want these to be one-time wear garments but rather something I can work into my permanent wardrobe.
After going through my stash (it's big, folks) and a trip to Mill End for essentials which inevitably ended with a few mysterious non-essentials in my bag (I hate when they do that) I started cutting today. Here is what I have so far:
 Blue/Tan pinwale corduroy trousers. I was looking for some hard denim for this pattern, but I just have a thing for underdyed corduroy. I prewashed the fabric in hot water, which removed a lot of the sizing and gave the fabric a much softer hand.
I also removed the front pleat when I cut these out. Why anyone puts a pleat on the front of trousers is beyond me. That is not the place on my body where I want fullness added. I will probably elimate the cuff as well, but cut the full length in case I change my mind.
 Dandelion Cotton Jumper/Sundress
This is a reprint of a vintage pattern, and I altered it so that I can wear it alone if I want. I raised the armscyes 1/2" and narrowed the boatneck by 1". I cut the fuller skirt view for this, but will probably make the other view later on.
I found some great buttons but since this closes with a zipper, they will most likely go on a matching jacket or cardigan. I saved the scraps for trim as well. Maybe something in a cream. We'll have to see what wonders the stash has to hold.
 Black/White Graphic Print Linen Skirt
I have been eyeing this fabric since last fall when I first saw it at Mill End. It is a fairly stiff linen, so it should work well with this 8-gored skirt pattern. I also like the idea of breaking up the print with the piecing. Because I couldn't find any buttons which went with the style of the fabric, I'm eliminating them and will use an invisible back zipper. To make this more of a 50's era skirt, I am raising the hemline to just below the knee (this will also make it more wearable as a summer skirt) and lowering the raised waist detail. To accentuate the lines of the skirt, I will use a black bias trim on the waistband and may do the same for the hem.
 Graphic Print Green Silk Sleeveless Blouse
There was just barely a yard of this when I spied it on the counter last night, so no sleeves. The green is more vibrant in person; I'll try to take some shots in sunlight as I progress.
This is a very lightweight silk but has nice body so it won't shimmy around when I'm trying to sew it. I cut this blouse with the collar so that it will wear nicely with the yellow jumper. Can you tell I'm longing for spring??
No buttons purchased yet, I forgot my list at home so will have to go back. Oh dear.
 Orange Hemp Knit Top
I love wearing scoop neck tees- I hate having them come untucked all day long. So I am attempting to replace my purchased shirts with longer ones. I made this pattern up last winter, and love how it fits. I will be making this with cap sleeves, since it's meant to be used for layering and this is a spring wardrobe.
Well, that's what I have so far. I need to put together a few more tops and a jacket but I'm off to a start!
**I removed two of the pieces that just weren't working with the others. I'll be posting pictures of the new revised swap later this evening.**
I have always loved the classic styles of the 30's and 40's, and have been wearing more and more vintage and vintage inspired clothing the past few years. Because I recently started up the Past Times Society (more about that later) I will be needing more vintage clothing from a variety of decades. Because I am rather practical, I don't want these to be one-time wear garments but rather something I can work into my permanent wardrobe.
After going through my stash (it's big, folks) and a trip to Mill End for essentials which inevitably ended with a few mysterious non-essentials in my bag (I hate when they do that) I started cutting today. Here is what I have so far:
 Blue/Tan pinwale corduroy trousers. I was looking for some hard denim for this pattern, but I just have a thing for underdyed corduroy. I prewashed the fabric in hot water, which removed a lot of the sizing and gave the fabric a much softer hand.
I also removed the front pleat when I cut these out. Why anyone puts a pleat on the front of trousers is beyond me. That is not the place on my body where I want fullness added. I will probably elimate the cuff as well, but cut the full length in case I change my mind.
Dandelion Cotton Jumper/SundressThis is a reprint of a vintage pattern, and I altered it so that I can wear it alone if I want. I raised the armscyes 1/2" and narrowed the boatneck by 1". I cut the fuller skirt view for this, but will probably make the other view later on.
I found some great buttons but since this closes with a zipper, they will most likely go on a matching jacket or cardigan. I saved the scraps for trim as well. Maybe something in a cream. We'll have to see what wonders the stash has to hold.
 Black/White Graphic Print Linen Skirt
I have been eyeing this fabric since last fall when I first saw it at Mill End. It is a fairly stiff linen, so it should work well with this 8-gored skirt pattern. I also like the idea of breaking up the print with the piecing. Because I couldn't find any buttons which went with the style of the fabric, I'm eliminating them and will use an invisible back zipper. To make this more of a 50's era skirt, I am raising the hemline to just below the knee (this will also make it more wearable as a summer skirt) and lowering the raised waist detail. To accentuate the lines of the skirt, I will use a black bias trim on the waistband and may do the same for the hem.
 Graphic Print Green Silk Sleeveless Blouse
There was just barely a yard of this when I spied it on the counter last night, so no sleeves. The green is more vibrant in person; I'll try to take some shots in sunlight as I progress.
This is a very lightweight silk but has nice body so it won't shimmy around when I'm trying to sew it. I cut this blouse with the collar so that it will wear nicely with the yellow jumper. Can you tell I'm longing for spring??
No buttons purchased yet, I forgot my list at home so will have to go back. Oh dear.
Orange Hemp Knit TopI love wearing scoop neck tees- I hate having them come untucked all day long. So I am attempting to replace my purchased shirts with longer ones. I made this pattern up last winter, and love how it fits. I will be making this with cap sleeves, since it's meant to be used for layering and this is a spring wardrobe.
Well, that's what I have so far. I need to put together a few more tops and a jacket but I'm off to a start!
**I removed two of the pieces that just weren't working with the others. I'll be posting pictures of the new revised swap later this evening.**
Wednesday, January 14, 2009
An Ode to Ugly Fabric
I love ugly fabric. First and foremost because it's the underdog. It just sits there, in the store or at home, on a shelf, being pathetic and catching dust. It can be hard to believe that someone somewhere actually took the time to dream it up, design it, and then manufacture it. The Faux Patchwork in Primary Colors. The Pink and Green Tiger Stripe Courduroy. The Peter Max Exploded on Polyester Double Knit.
It comes from all over; if you sew, you know that Ugly Fabric will find you. Sometimes it arrives in a bag along with a person who just knows "you'll use this." Sometimes it sneaks its way into your cart at the fabric store (it will make an interesting tote bag). Sometimes, honestly, it's just too cheap to leave behind. But however it got there, now it's staring at you and you have no idea what on earth to do with it.
Make friends with your Ugly Fabric. First of all, you know you can't make it worse. Really. Is there one thing that you just never got the hang of? Sacrifice your UF for the greater good. Make a placket. Learn welted pockets. Install five styles of zippers. Break out the decorative stitches that you never use on that fancy machine. Learn the machine blind hem. Teach yourself the art of fiber determination (that one's fun!). Let your friendly neighborhood Budding Crafter learn the art of Sock Monkeys.
Ugly Fabric can make a great interfacing. Or stabilizer. Or jacket lining. I have found more than one UF that turned out to be Fun and Funky when cut into bias strips and used as piping or seam binding; those awful daisies become abstract color blotches when you take them out of context.
In short, Ugly Fabric will never let you down. Silks, satins, chiffon; they have all promised you amazing outcomes but in the end have been a tangled heap in the bottom of your to-do pile. Ugly Fabric promises nothing but can give you amazing results. So play with it! Learn from it! What do you have to loose? It's already Ugly!
Zippers: a Field Guide
Ah, the Zipper. It is a wonderful invention, and makes life oh so much easier. From skirts to coats to purses, it is simply an amazing convenience. And yet there are those who curse its name. Why, do you ask? Is it those times when the metal teeth bite at the knuckles? Is it the errant jeans zipper that refuses to remain up? No, it's not that.
The Zipper is maligned because it can be difficult to coax this contraption into a garment without loosing one's mind. I have wrestled with this dilema, and come out on top. There are just a few simple things to remember when tackling a zipper insertion.
Use a zipper foot. It should be adjustable so that you can sew on either the right or left side without having to flip the garment around. Some are skinny, some are T-Shaped. If yours annoys you, find one that you like. No sense in trying to befriend something that aggravates.
Follow the seam allowance recommendations. There are times to be footloose and fancy free, this isn't one of them. Too little allowance and your jeans look like a Rolling Stone album cover. Too much and you end up playing Where's my Zipper Pull when all you want is to pay the check and get back to work before you're late.
When possible, follow the instructions. Read them all before you begin, out loud. You don't want any surprises. If you are working without instructions, dig around for a pattern that has a similar zipper placement and use those. This might just be for me, but I am a very visual learner and this is no time for heroics.
If you find a technique that you love, staplegun it to the wall. You can always cover those holes with paint when you move and the landlord will never know. If you find a technique that you hate, cross it out with a big black marker so that you never go down that path again. *okay, those last two tips apply to all sewing instructions. Especially pockets.
Make sure your zipper is being placed on the straight of grain. This will help prevent that awful puckering that screams Look At ME! I'm wonky! No one wants a wavy zipper. If your fabric is lightweight, consider using some interfacing. If you are putting in an invisible zipper, buy the plastic zipper foot sold by the manufacturer. This will save you hours of aggravation.
First make a sampler. Then, remember to put the zipper in before you sew the rest of the seam. I know it sounds odd, but if you don't, you will end up with an odd little bubble below your zipper. And that kinda kills the point of an Invisible Zipper, doesn't it? *Invisible zippers are almost always sewn on a curved seam. They get to be the exception to the straight of grain rule.*
And in the end, if you find that no amount of coaxing gets that darn Zipper into place, take a deep breath. Get some ugly fabric and play with different methods. You'll find one that works for you.
Always Name Your Machine
I have had several sewing machines in my life. The first machine I used was my mother's, and it had been passed to her from someone before. We weren't allowed to use her machine but I honestly preferred the old black machine with its gold scrollwork and sense of history. If a belt came off, you just put it back on. I could figure out how all of the mechanisms worked at the ripe old age of 10. There was no great mystery to how it worked, and that instilled a feeling of creativity. If something went wrong, I could fix it. But it wasn't my machine; I shared it with two of my sisters.
Since then I have been through a Necchi, a White, and currently own an Elna. It never occured to me that I would name a machine until I met my friend Melissa. Her machine, by the way, is named Solange. At first I thought it odd, but it really isn't. People name cars, after all. My Gram Driver was always urging Betsy (her VW bug) to make it up a hill. More importantly, your sewing machine is your essential partner in your sewing endeavor. If it (he/she) isn't feeling so well, you won't have as good of an end result. If your machine is well cared for and understood, you will amaze yourself with what you can do.
But before you name your machine, you have to get to know it. Every machine is different both in model and in temperament. My first machine worked just fine but I never really knew it. If there was ever a problem with it I would often walk away for weeks before trying again. Oiling does not fix everything. At one point I was convinced it was nothing more than a doorstop, when it simply required rethreading. It was retired after three years. My next machine and I got off on a much better foot. I read the manual (think of it as a personal ad) before opening the box. If it resisted something I tried to make it do, I would ease back a bit. There was the one time I burned out a foot pedal, but there was a deadline involved. As we worked together, I came to appreciate the steady, sure nature of my new partner. She was christened Beatrice and worked well for many years.
Here are the things you should know about your machine:-how many stitches does it have? more importantly, how many of those stitches do you use?-how fast does your machine run? is it easy to control the speed through pedal pressure?-what kind of buttonhole attachment do you have?-how quickly or easily can you thread your machine?-does the placement of the adjustment knobs/dials/buttons make sense to you?There is no one perfect machine, just as there is no one perfect bottle of wine, car, or person. Find a machine that works for you, works with you, and compliments your style. Play with it. Work with it. Get to know it.
the zen of sewing
There are very few absolutes in sewing. This is why I love it so much; there is so much room to play and have fun. However, as we learned so long ago in the sandbox, in order for everyone to have fun there are a handful of basic rules that we all must regard.
First rule: Keep with your grain. It doesn't matter which way you go, just keep going that way. If you make an entire garment upside down or sideways, as long as it matches itself everything will be fine. But if you try to make a sharp turn halfway through everyone will know that something is wonky. Now, if you want everyone to notice that you were daring enough to change course halfway through, go for it. Think of it like this; if you're an art major and show up for honors physics, people will notice. If you can do both, great! You go, girl. But make sure you know what you're doing because if not everyone will be paying attention when you bail.
Second Rule: Never loose your center. Ever. Mark it. Write down where you put it. Because you will some day find yourself happily pleating or trimming over on the side bodice, not a care in the world, when you realise that your beautiful accent doesn't match the other side. All the floof in the world can't cover up the fact that you forgot where you going because you were having so much fun getting there. It's not the 80's, nobody is going to believe that you just really like assymetrical blouses. So every once in a while, stop what you're doing, get your bearings, check your notes, and locate your center. Because, like in life, not everything is available for a do-over.
Third Rule: In the end, you're going to need closure. Now, there are many styles of getting there and most of them are not wrong. Just know what it is that you are getting into before you start in that direction. Some of the most satisfying closures require that you plan far in advance. Bound buttonholes, for example, have to go in first. Invisible zippers too. So if you want to impress you have to make a plan. Now, if you're the type that likes to live on the edge, there are all sorts of fun possibilities for you as well. Buttons, snaps, hooks, ties, zippers, can all go in at the last minute. I'm not saying what kind of closure is best for you, I'm just saying that eventually you're going to be looking for it, so you may as well keep that in mind before you start. Or you could just wear a belt.
Subscribe to:
Posts (Atom)